What is cool about these templates is, once you add them to the "My Content" section of your gallery, anytime you have your SMARTBoard on, it is so easy to open one of these templates and have a cute page to write on! It will make the simplest thing you're working on seem more exciting and fun.
Here are the directions for adding the templates to the gallery, for those who might not know.
1. Once you download the file, open it up in Smart Notebook.
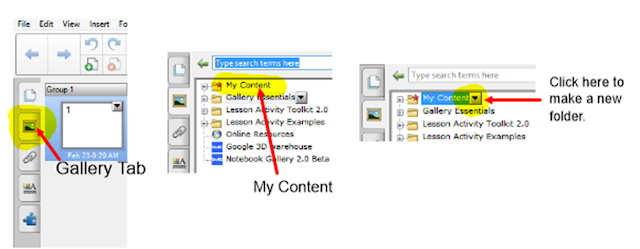
2. On either the left or right side of the page is what's called the page sorter tabs. The one that looks like a picture frame is the gallery. Click it, then click "My Content" at the top. You will then have the option to create a new folder, which is a good idea to keep your files organized. Name this folder, "Templates."

3. Click on the tab above the Gallery that looks like two pieces of white paper. This is the page sorter tab and it always brings you back to the view of the pages in your file.
4. On the thumbnail of the page you want to add, click the little inverted triangle in the top right corner. A drop-down menu will open. Way at the bottom, click "Add to Gallery."
That's it! Once you have put the first page in, the rest of the pages are easier, because you have already selected the "Templates" folder, so you only have to click on each thumbnail and choose "Add to Gallery". By default, they will go into the same folder.I hope you enjoy these templates and...think spring!


Hi Cathy!
ReplyDeleteI found your blog on Fifth in the Middle "Maine" bloggers! I'm also from Maine and I teach fifth grade! I'm your newest follower and I look forward to reading your blog!
TeachingIsLove
Thanks! I'm still working on the design aspect of my blog. I'm going to work with Megan from Bird in the Hand Designs in the next couple of weeks to fancy it up. I just checked out your blog, which looks terrific! Nice to connect with a fellow Mainer. I am your newest follower!
ReplyDelete